Deleting My AI on Snapchat is simple and straightforward. First, ensure your app is up-to-date.
Then, follow a few steps to remove the AI. Snapchat’s AI features can sometimes feel intrusive. They might not always fit your needs or preferences. Understanding how to delete these features can give you more control over your Snapchat experience.
It’s essential to keep your app experience tailored to your liking. This guide will walk you through the steps needed to remove My AI from Snapchat. With these instructions, you can quickly regain control and enjoy a more personalized app experience. Let’s dive in and make Snapchat work better for you.
Accessing Snapchat Settings
Accessing Snapchat settings is the first step to manage your account. This includes deleting My AI on Snapchat. Follow these simple steps to access the settings.
Opening The App
First, unlock your phone. Locate the Snapchat app icon on your home screen. Tap the icon to open the app. Ensure you are logged into your account.
Navigating To Settings
Once the app is open, find your profile icon at the top left corner. Tap on it. This will take you to your profile page. Look for the gear icon at the top right corner. Tap the gear icon to open the settings menu.

Credit: www.youtube.com
Locating My Ai
Locating My AI on Snapchat can be a bit tricky. If you’re trying to delete this feature, the first step is to find it. This guide will help you locate and understand the AI feature on Snapchat.
Finding The Ai Feature
Open your Snapchat app. Look for your profile icon in the top left corner. Tap on it to go to your profile page. Scroll down until you see the ‘Settings’ gear icon. Tap on the gear icon to open the settings menu. In the settings menu, scroll until you find the section labeled ‘AI Features’. This section will show all AI-related features available on Snapchat.
Understanding Ai Options
Within the ‘AI Features’ section, you’ll see various options. These options include filters, lenses, and other tools that use AI. Tap on each option to understand what it does. Some options might have sub-menus with more settings. Take your time to explore these. Knowing what each option does will help you decide which ones to keep or delete.
Initiating Deletion Process
Deleting an AI on Snapchat is simple. Follow the steps below to begin the process. This guide will help you select the AI to delete and confirm the deletion. Start by opening your Snapchat app.
Selecting Ai To Delete
First, navigate to the AI section in your Snapchat app. Follow these steps:
- Open Snapchat and go to your profile.
- Tap on the AI section.
- Find the AI you want to delete.
Ensure you have selected the correct AI before proceeding.
Confirming Deletion
Once you have selected the AI, follow these steps to confirm deletion:
- Tap on the AI you wish to delete.
- Click on the delete option.
- Confirm your choice by tapping “Yes”.
After confirming, the AI will be permanently deleted from your account.
Verifying Deletion
Once you have followed the steps to delete your AI on Snapchat, it is crucial to confirm that the process was successful. Verifying deletion ensures that your AI data is completely removed, maintaining your privacy. This section will guide you through the steps to check the status and ensure the removal of your AI.
Checking Ai Status
To verify if your AI has been deleted, follow these steps:
- Open the Snapchat app on your device.
- Navigate to the Settings menu by tapping on your profile icon and then the gear icon.
- Scroll down to find the AI Management section.
- Check if the AI status indicates that it is disabled or removed.
If you see a message confirming the AI is disabled, it means the deletion was successful. If the AI is still active, you may need to repeat the deletion steps.
Ensuring Ai Removal
After verifying the status, further ensure that all AI data is removed from your account:
- Clear the app’s cache by going to Settings > Apps > Snapchat > Storage > Clear Cache.
- Log out of Snapchat and then log back in to refresh the app.
- Check for any leftover AI data in your profile settings or data management sections.
If you find any data, contact Snapchat support for assistance in removing it completely.
| Step | Action |
|---|---|
| 1 | Open Snapchat and go to Settings |
| 2 | Navigate to AI Management |
| 3 | Check AI status |
| 4 | Clear Cache and Log Out |
| 5 | Check for leftover data |
These steps help you ensure your AI data is fully removed from Snapchat, maintaining your privacy.
Managing Ai Permissions
Managing AI permissions on Snapchat is crucial for your privacy. AI can access different parts of your Snapchat data. Understanding how to manage these permissions can help keep your information secure. Follow these steps to adjust privacy settings and revoke AI access as needed.
Adjusting Privacy Settings
First, open Snapchat and go to your profile. Tap the gear icon to access settings. Scroll down to the “Privacy” section. Here, you can see various options for managing your data. Look for the AI permissions setting. Toggle off any permissions you are not comfortable with. This can include location, contacts, and camera access. Adjusting these settings can help you control what AI can see.
Revoking Ai Access
If you want to revoke AI access completely, follow these steps. Go back to the “Privacy” section in settings. Find the option labeled “Manage AI.” Tap on it to see all AI-related permissions. You will see a list of permissions granted to AI. Tap on each permission to revoke access. Confirm your choice when prompted. This will ensure AI can no longer access your data.
Credit: 9to5mac.com
Alternative Solutions
Are you looking for alternative ways to handle the AI on Snapchat? You don’t always need to delete it. There are other methods to manage it effectively. This section explores some practical solutions.
Disabling Ai Temporarily
If the AI is causing issues, you can disable it temporarily. This helps you take a break without permanently removing it. Follow these simple steps:
- Open the Snapchat app.
- Go to your profile.
- Tap the settings icon.
- Navigate to the “Privacy” section.
- Find the AI feature and toggle it off.
This method lets you regain control without losing your AI data. You can turn it back on anytime.
Customizing Ai Settings
Sometimes, adjusting the AI settings improves your experience. Personalize how the AI interacts with you. Here’s how:
- Open the Snapchat app.
- Go to your profile.
- Tap the settings icon.
- Find the “AI Settings” section.
- Adjust the preferences as needed.
You can change how often the AI engages with you. Adjust notifications and other interactions. Customizing these settings makes the AI more useful and less intrusive.
Consider these alternative solutions before deciding to delete the AI on Snapchat. They offer flexibility and control over how you want to use the AI features.

Credit: www.youtube.com
Frequently Asked Questions
How To Delete My Ai On Snapchat?
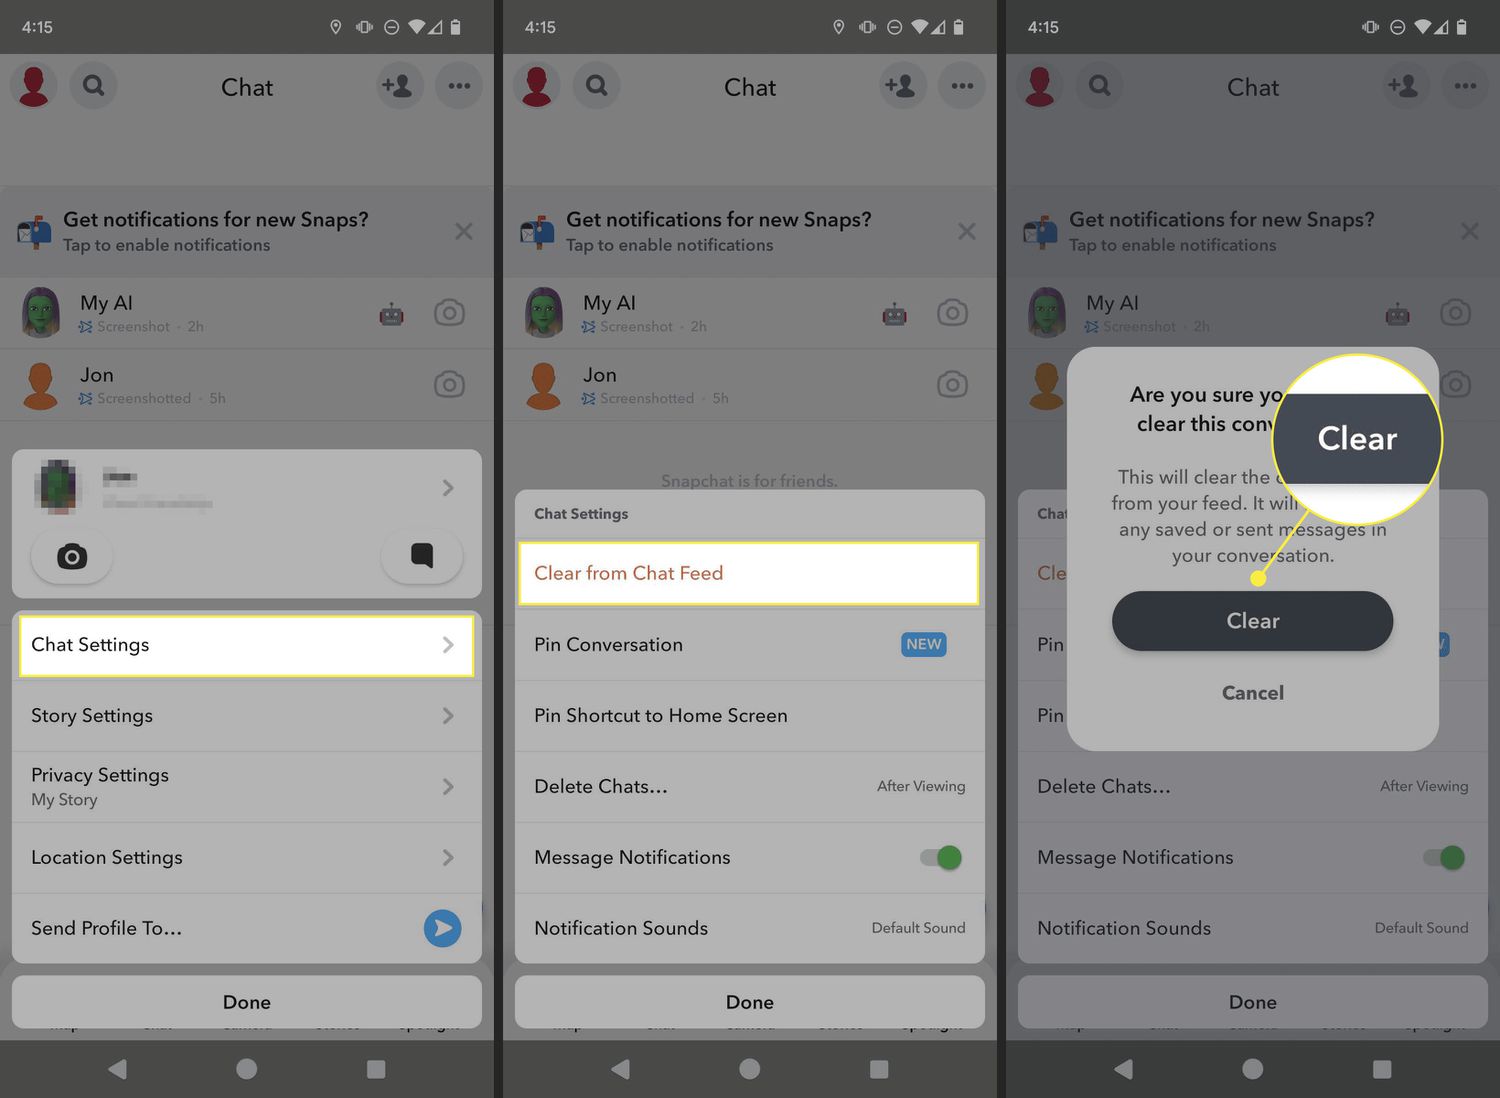
To delete My AI on Snapchat, go to the chat section, find My AI, and swipe left. Then, tap on ‘Delete’ to remove it.
Can I Remove My Ai From Snapchat?
Yes, you can remove My AI from Snapchat by going to the chat section, finding My AI, and deleting it.
Why Can’t I Delete My Ai On Snapchat?
If you can’t delete My AI, try updating your app. Sometimes, outdated versions might not have the delete option.
Is Deleting My Ai Reversible On Snapchat?
Deleting My AI on Snapchat is not reversible. Once removed, you cannot restore it without reinstalling the feature.
Conclusion
Deleting your AI on Snapchat is simple and quick. Follow the outlined steps. Your privacy matters, and removing the AI can help maintain it. Always check for updates to the app. Sometimes, methods change with new versions. Stay informed and keep your account secure.
If you need further help, consult Snapchat’s support. Enjoy a more personalized Snapchat experience without unwanted AI.